
It also explains the difference between a Task name, Report Title, and Report Subject, as well as how comments, statuses, Actions, translations, and confidentiality support follow-up and traceability.
What is a Report?
A Report is the record created when a user completes and submits a Task or Training flow.
The Report stores the information captured during completion. Comments, status changes, approvals, and follow-up Actions added after submission also become part of the Report’s history.
Reports therefore provide a traceable record of work completed in Intellect.
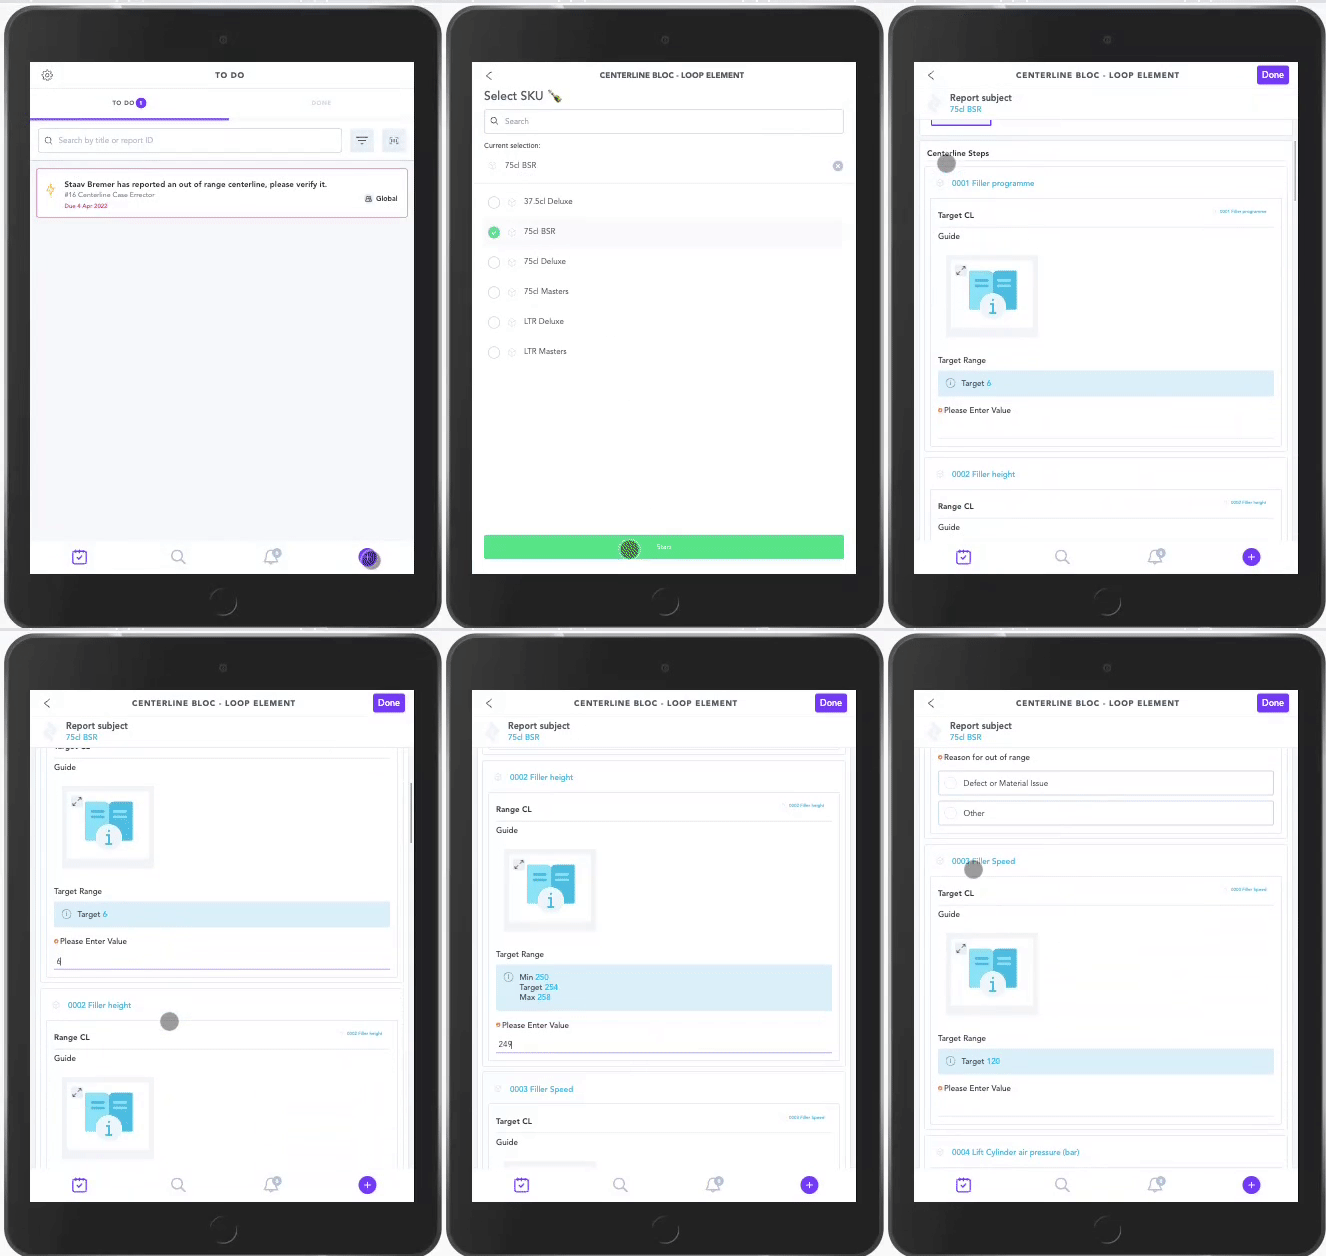
Example 1 – Report from a scheduled Task
An operator completes a daily CIL for Filler 1 from their To Do List.
Once submitted, Intellect creates a Report containing the operator’s answers, readings, photos, submission time, and selected machine.
Example 2 – Report from Training
A user completes a competency assessment.
Intellect creates a Training Report containing the submitted answers, completion details, and assessment status. The completion is also recorded against that user.
Task Reports and Training Reports
Reports originate from completed Tasks or Training flows.
Task Reports
A Task Report is created when a Task is submitted.
The Task may have been:
-
- assigned through a schedule
- started manually from the ad hoc menu
- opened from a Unit page
- started through another configured process
- created through an integration
Whether the Task was scheduled or started ad hoc, the result is still a Task Report.
Training Reports
A Training Report is created when a Training flow is submitted.
Training Reports are linked to the person who completed the Training and may include an assessment result, approval information, or competency status.
They also contribute to the user’s Training record and compliance information.
What information appears on a Report?
The exact content of a Report depends on how the original Task or Training flow was built.
A Report may show:
| Information | What it tells you |
|---|---|
| Report Title | The name used to identify the submitted Report. |
| Report ID | The unique identifier assigned to the Report. |
| Report Subject | The Unit the Report relates to, where one was configured or selected. |
| Submitted answers | The responses captured during completion. |
| Media and attachments | Images, videos, signatures, or files submitted with the flow. |
| Submitted by | The user who completed the Task or Training. |
| Submission date and time | When the Report was completed and submitted. |
| Status | The current review stage or outcome of the Report. |
| Comments and Timeline activity | Updates added after the Report was submitted. |
| Related Actions | Follow-up work raised from the Report. |
Finding Reports in the App
The Reports a user can access depend on their account, the content available to them, and their permissions.
1. Done tab
The Done tab shows Tasks, Training, and Actions completed from the signed-in user’s account.
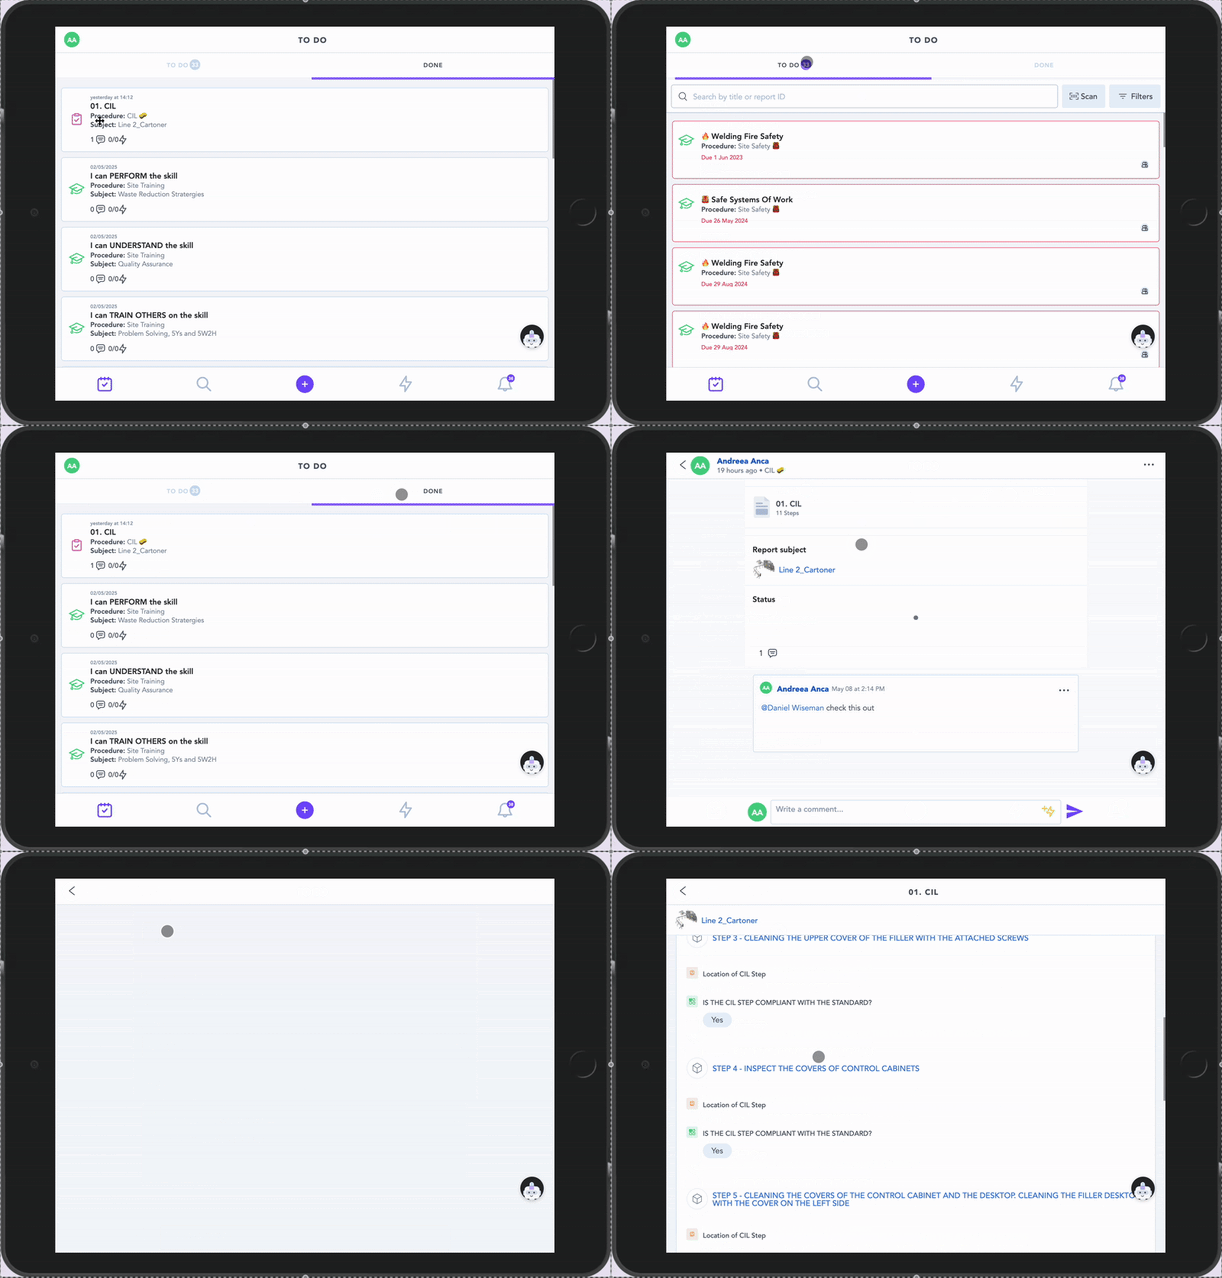
A user can reopen their submitted Report to review its answers, status, comments, and Timeline activity.
Example: An operator wants to confirm the reading they entered during the previous shift. They open the Done tab, locate the completed Task, and reopen the Report.
The Done tab is primarily a record of that user’s completed work. It does not automatically show all Reports submitted by other members of the same Team.
2. Unit Timeline
When a Report has the subject of/ is linked to a Unit, it will appear on that Unit’s Timeline.
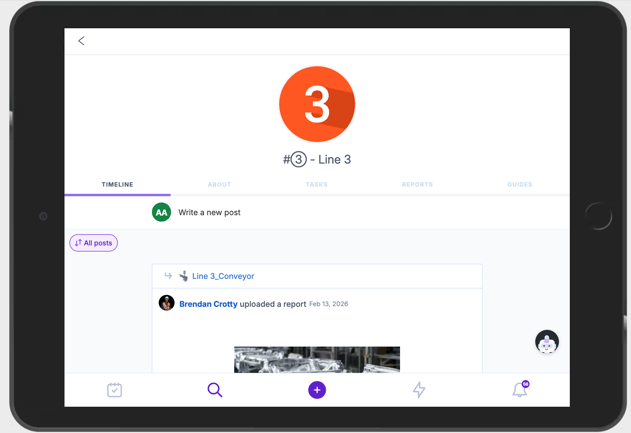
A Unit may represent a site, area, production line, machine, asset, product, SKU, or another item configured in Data Management.
To access a Unit Timeline:
-
- Open the Search page in the App.
- Search for or scan the relevant Unit.
- Open the Unit page.
- Select the Timeline area.
Example: Before beginning work on Filler 1, an engineer opens its Unit Timeline. They can see that a defect was reported on the previous shift, open the Report, and understand what follow-up has already taken place.
3. Procedure Timeline
Reports may also appear on the Timeline of the Procedure they belong to.
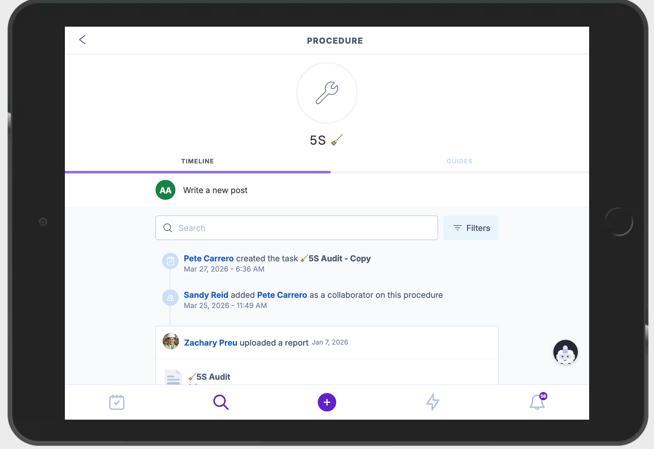
The Procedure Timeline provides a wider view of recent activity across the process or use case, rather than focusing on one individual Unit.
Example: A Team Leader opens the Defect Handling Procedure Timeline to review the latest defects, comments, and status changes raised across the area.
What a user can see depends on their access to the Procedure and the visibility of each Report.
Finding Reports in the Portal
Portal users can access Reports from the relevant Procedure, Unit, or Board.
1. Tasks page
The main route for reviewing Task Reports within a Procedure is:
-
- Open Procedures.
- Open the relevant Procedure.
- Go to the Tasks page.
- Locate the submitted Reports table.
- Search for and open the required Report.
The table contains Reports generated from Tasks in that Procedure.
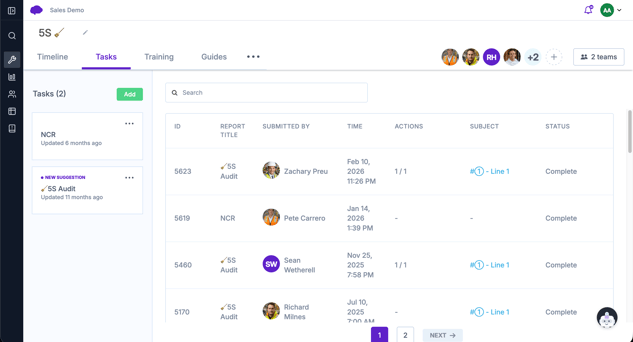
Users can use the available search and filter options to locate submissions, including searches by Report Title or Report ID.
Example: A Quality Manager wants to review submissions from the Packaging Quality Check Task. They open the relevant Procedure, go to the Tasks page, and use the submitted Reports table to find the required records.
Reports are not a separate section within a Procedure. They are displayed in the submitted Reports table on the Tasks page.
2. Procedure Timeline
Reports can also be opened from the Procedure Timeline.
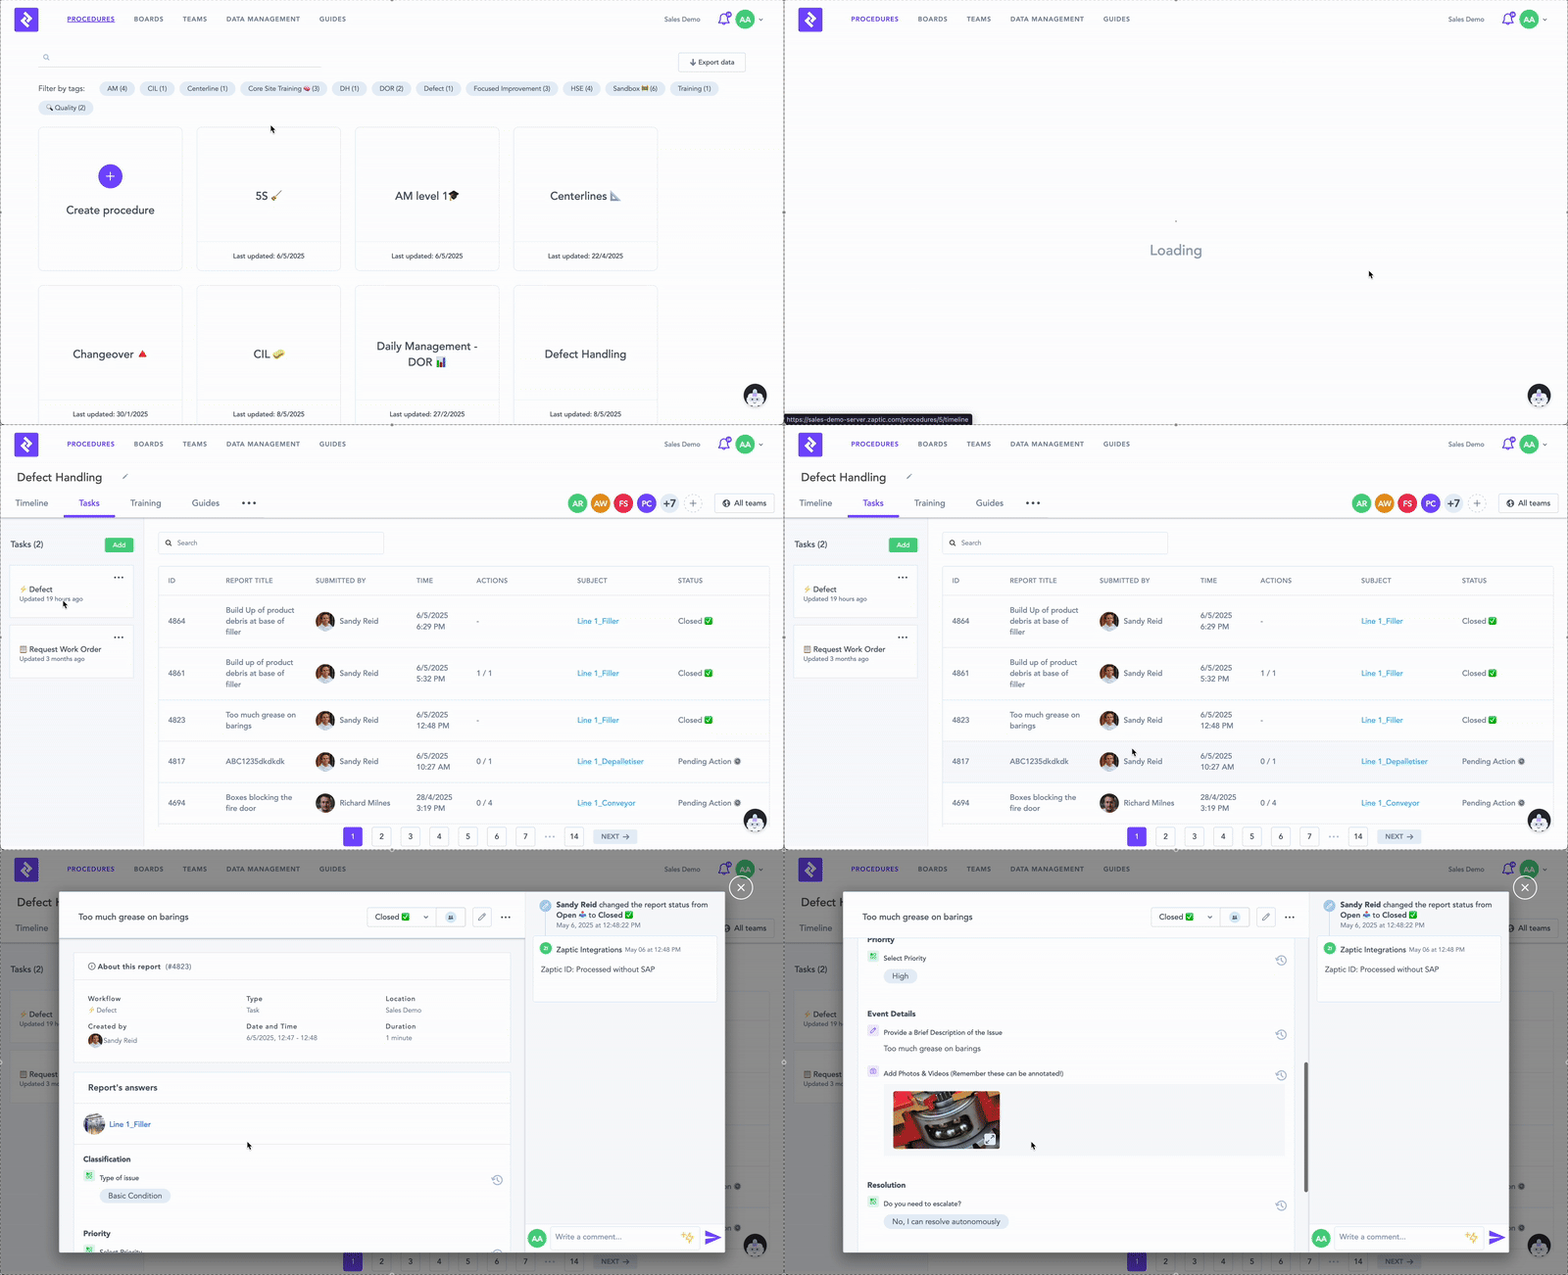
This is useful when users want to review activity in chronological order and understand what has happened recently across multiple Tasks, users, or shifts.
Example: A manager returning after several days away opens the Procedure Timeline to review recent Reports, comments, and status changes in sequence.
3. Unit Timeline
Portal users with access to Data Management can open a Unit and review its Timeline.
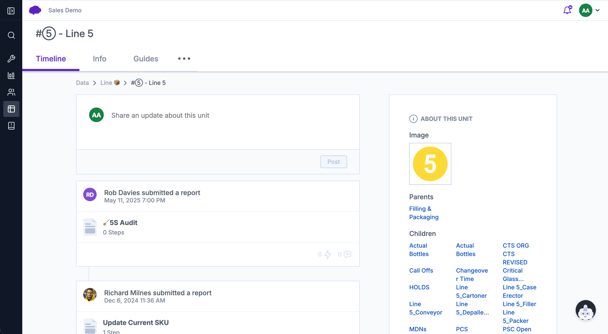
This provides a history of Reports and other activity connected to that Unit.
Example: A Maintenance Manager opens the Timeline for a machine to review recent inspections, defects, comments, and completed checks linked to that asset.
4. Boards
Boards provide an aggregated view of data captured through Reports.
Where configured, a Board can include a Report link or URL icon that opens the underlying Report.
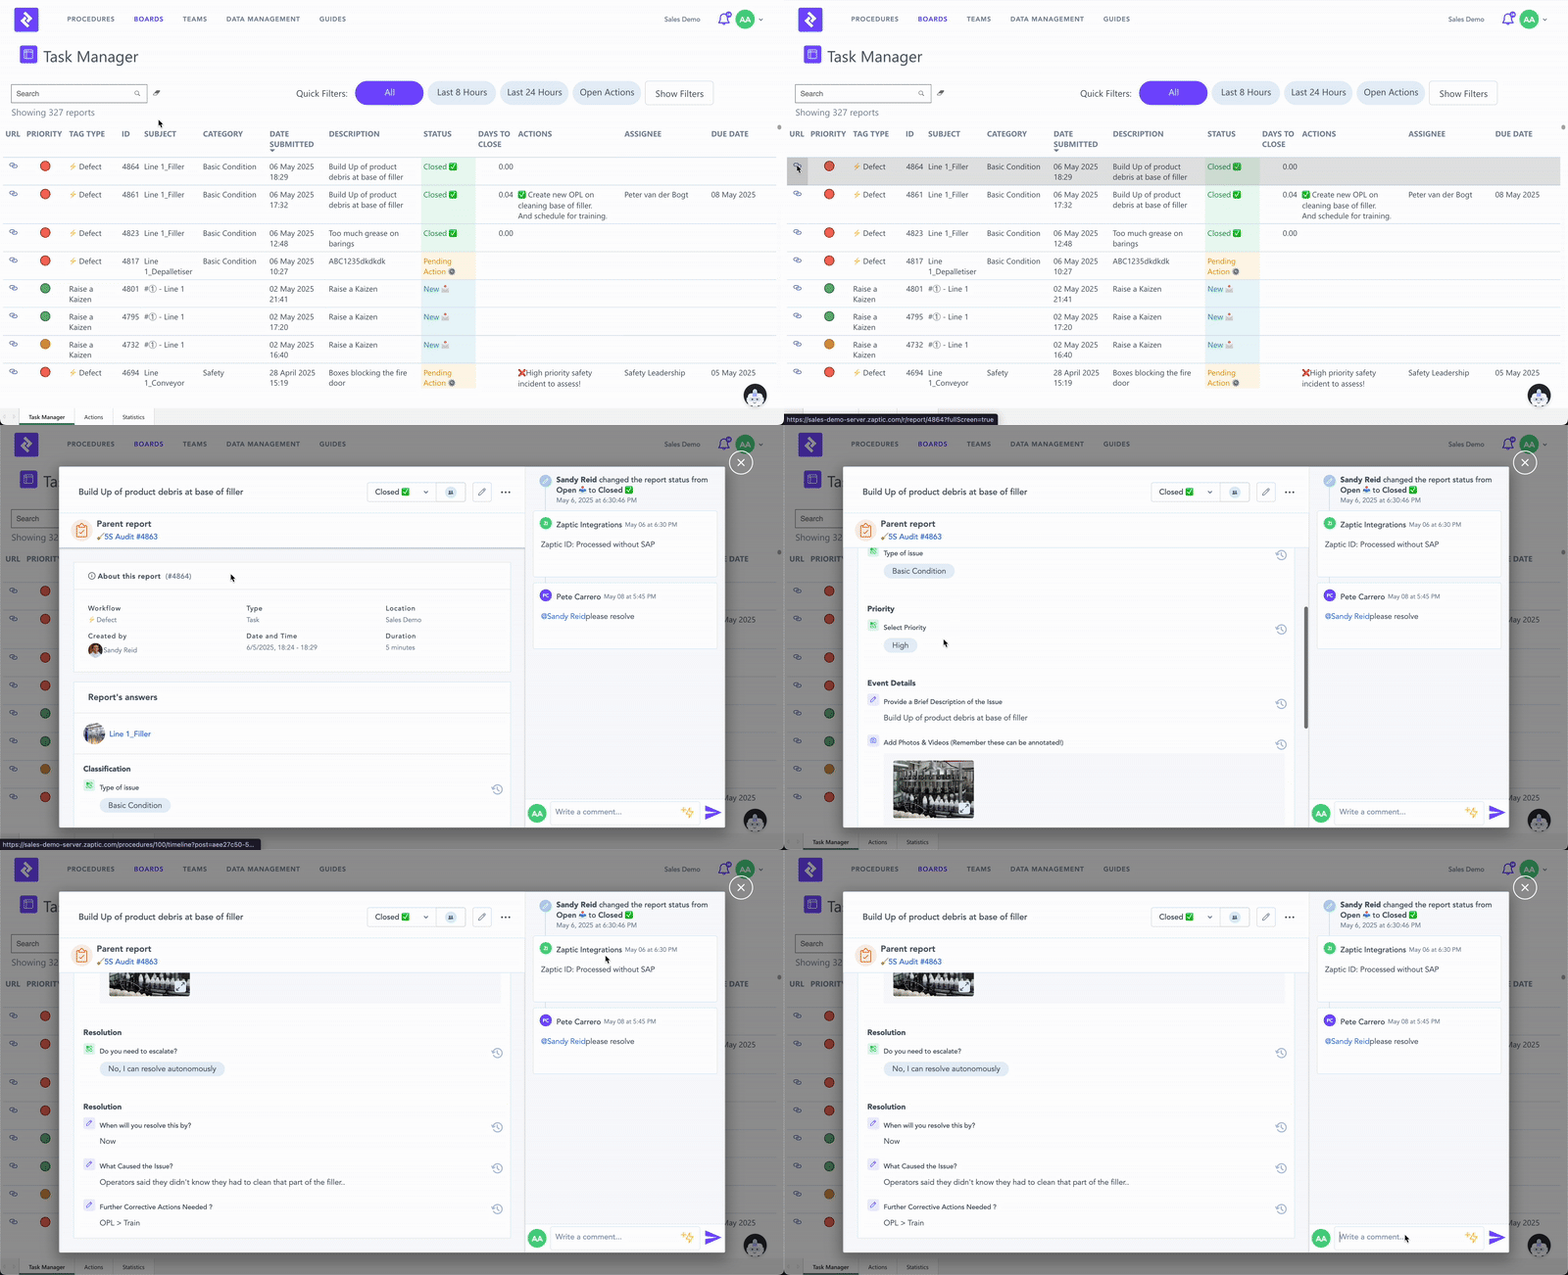
Not every chart, KPI, or visual automatically opens a Report. This depends on how the Board has been designed.
Example: A Board highlights several open high-priority defects. The user selects the Report link beside one entry to open the original submission and review its evidence, status, and follow-up activity.
Task name, Report Title, and Report Subject
These three concepts are related, but they serve different purposes.
| Concept | Meaning | Example |
| Task name | The fixed name of the flow users start and complete. | Report a Defect |
| Report Title | The name used to identify an individual submitted Report. | Report a Defect – Filler 1 – High Priority |
| Report Subject | The Unit the Report relates to. | Filler 1 |
Task name
The Task name is configured when the Task is created.
It identifies the workflow in places such as the Procedure, ad hoc menu, To Do List, and submitted Report information.
Changing the Report Title during completion does not necessarily rename or change the underlying Task.
Report Title
The Report Title is the name displayed for an individual submitted Report.
By default, the Report Title is generally based on the Task or Training name.
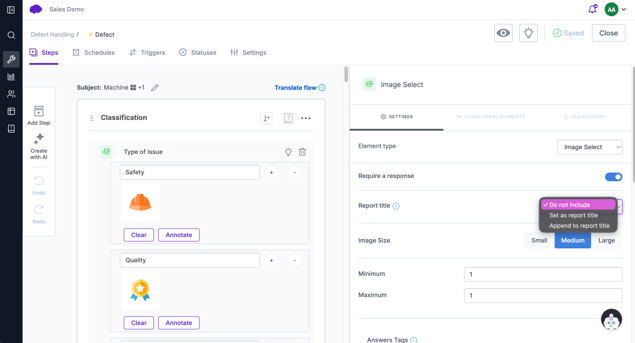
Flow authors can make Report Titles more meaningful by using answers captured during the flow. Depending on the element and its configuration, an element answer can either:
-
- set the Report Title, replacing the default title
- append to the Report Title, adding information to the existing title
Supported response types can include: Text Capture, Dropdown, Multiple Choice, Image Select, Date/Time, Number
Flow authors should choose only information that genuinely helps users identify the Report. Adding too many answers can make Report Titles unnecessarily long.
Report Subject
The Report Subject identifies the Unit the Report is about.
A Report Subject may be a machine, line, area, product, SKU, or another Unit configured in Data Management.
Using a Report Subject helps:
-
- connect the Report to the correct Unit Timeline
- preserve operational context
- support data and Boards
A flow may be configured to support more than one eligible Report Subject Unit Type where the same workflow applies to different types of Unit.
Accessing a submitted Report
Depending on their access and the flow configuration, users can interact with a submitted Report after completion.
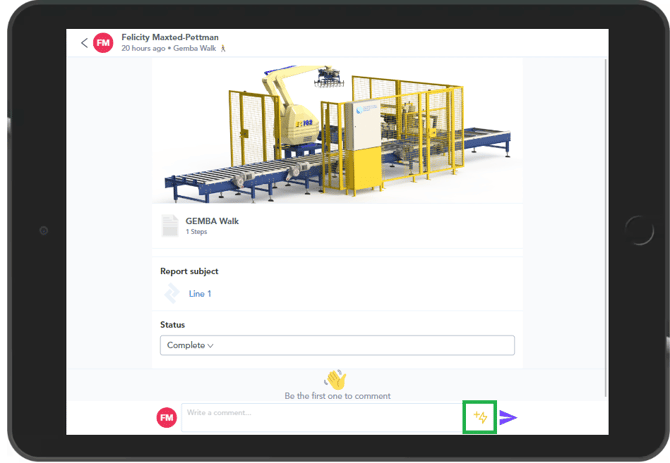
Comments can be used to add context, record decisions, provide updates, or explain how an issue was resolved.
Users can tag colleagues using the @ symbol where available.
Statuses
Statuses show the current stage or outcome of a Report.
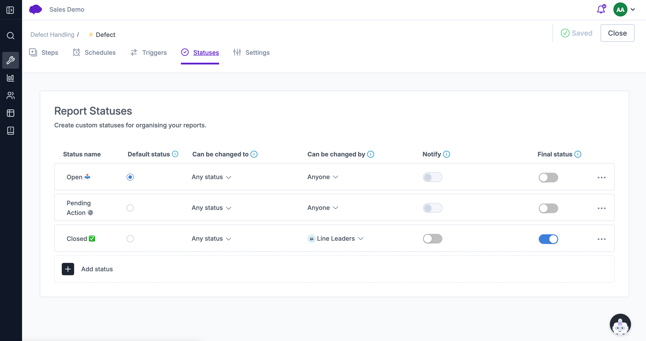
A defect Report might move through:
Open → Action Required → Closed
A Training Report might use:
Awaiting Assessment → Passed
Example: A quality issue is submitted with the status Open. After review, the Quality Team changes it to Action Required. Once the corrective work is verified, the status is updated to Closed.
The available statuses and who can apply them depend on how the flow has been configured.
Follow-up Actions
An Action can be created from a Report when additional work is required.
The Action remains connected to the originating Report, giving the assignee access to the original issue and submitted evidence.
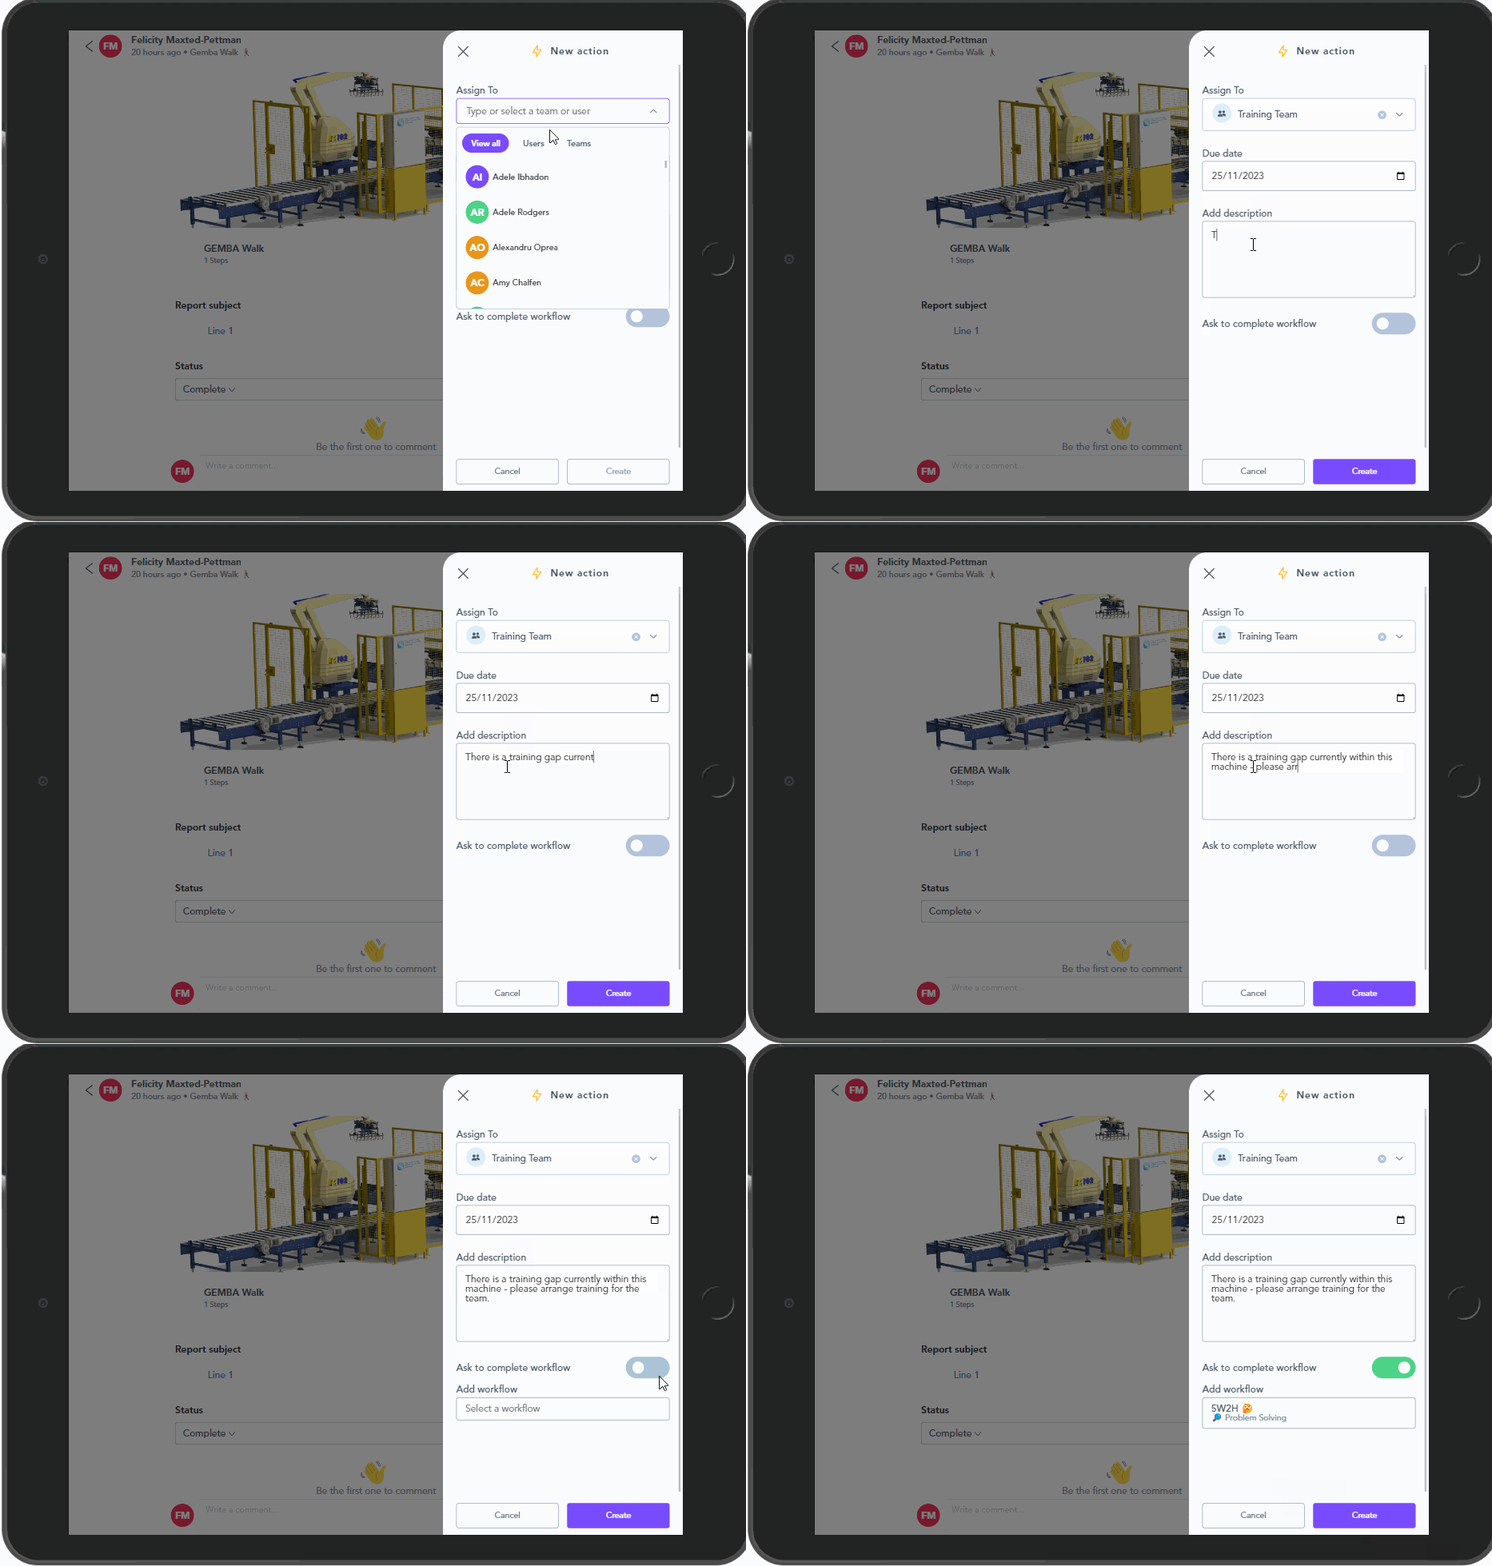
The full Action lifecycle is covered separately in the article Assigning an Action and the Actions Page.
Confidential Reports
Confidential Reports restrict access to sensitive submissions.
They may be used for safety incidents, HR-related concerns, private assessments, personal information, confidential investigations, or other sensitive operational issues.
Who can view Confidential Reports?
Users with the Confidential Reports permission can:
-
- view Confidential Reports
- mark Reports as confidential
- remove confidentiality from Reports
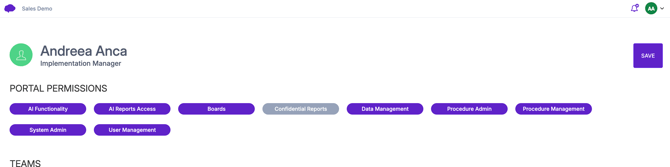
The person who submitted a Confidential Report can still view their own submission, but may not have permission to change its confidentiality status.
Users without the required permission cannot view the Report content.
Marking a Report as confidential
A Report can be marked confidential automatically through a trigger or manually.
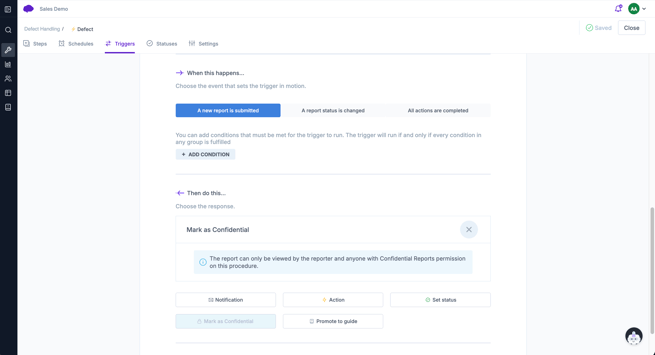
A Trigger can mark the Report as confidential when a defined condition is met.
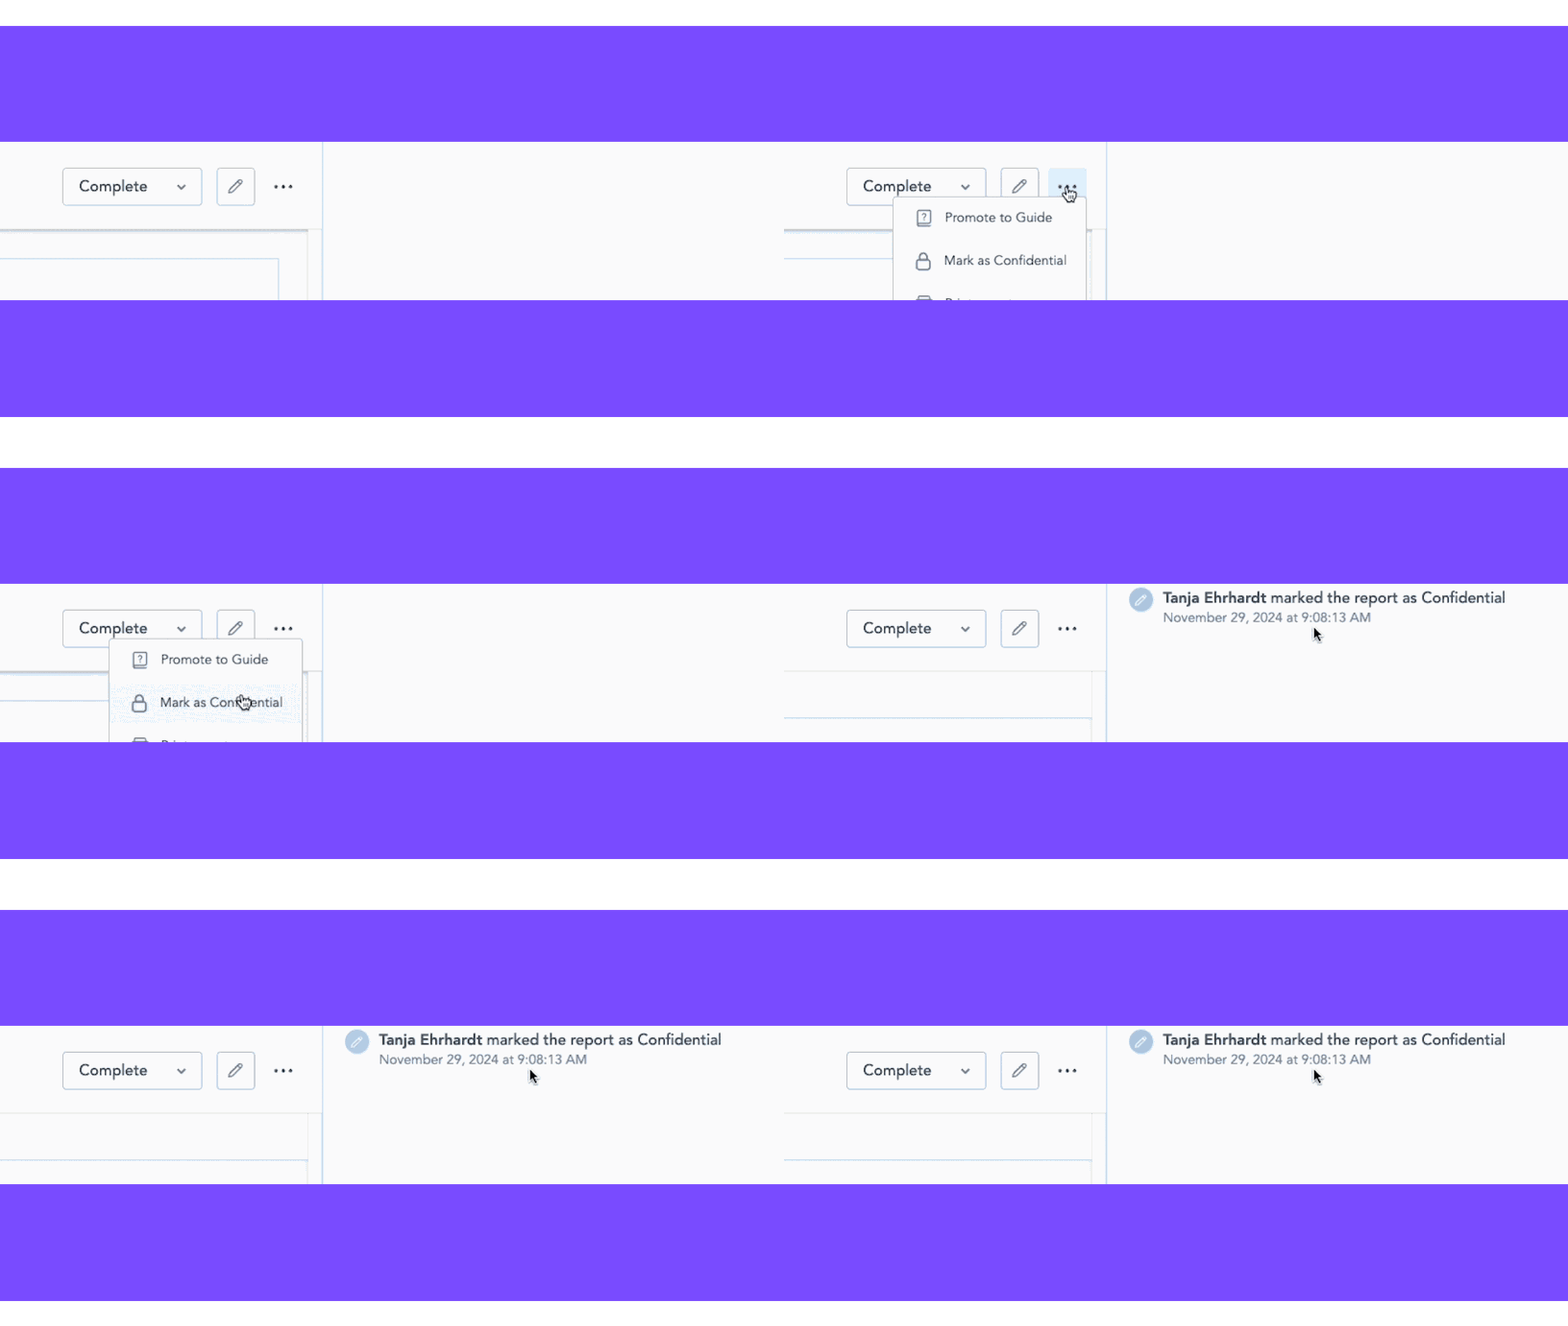
A permitted user can open the Report options in the Portal or App and select Mark as Confidential.
Users without Confidential Reports access cannot open or view the restricted Report data from Boards.